Test Sheet: C.Touch 2.0
Yocto Version
This test sheet targets the walnascar release of the NXP BSP. If you are working on a different Yocto version, refer to the corresponding test sheet on the meta-engicam-nxp branch for your release.
Test sheet i.Core MX8M Mini C.TOUCH 2.0
Test sheet
Version: 1.0
Preliminary
Creation of engicam-evaluation-image-mx8 image for sdcard booting and same image for eMMC programming.
Board Type: C.TOUCH 2.0
SOM Type: i.Core MX8M Mini
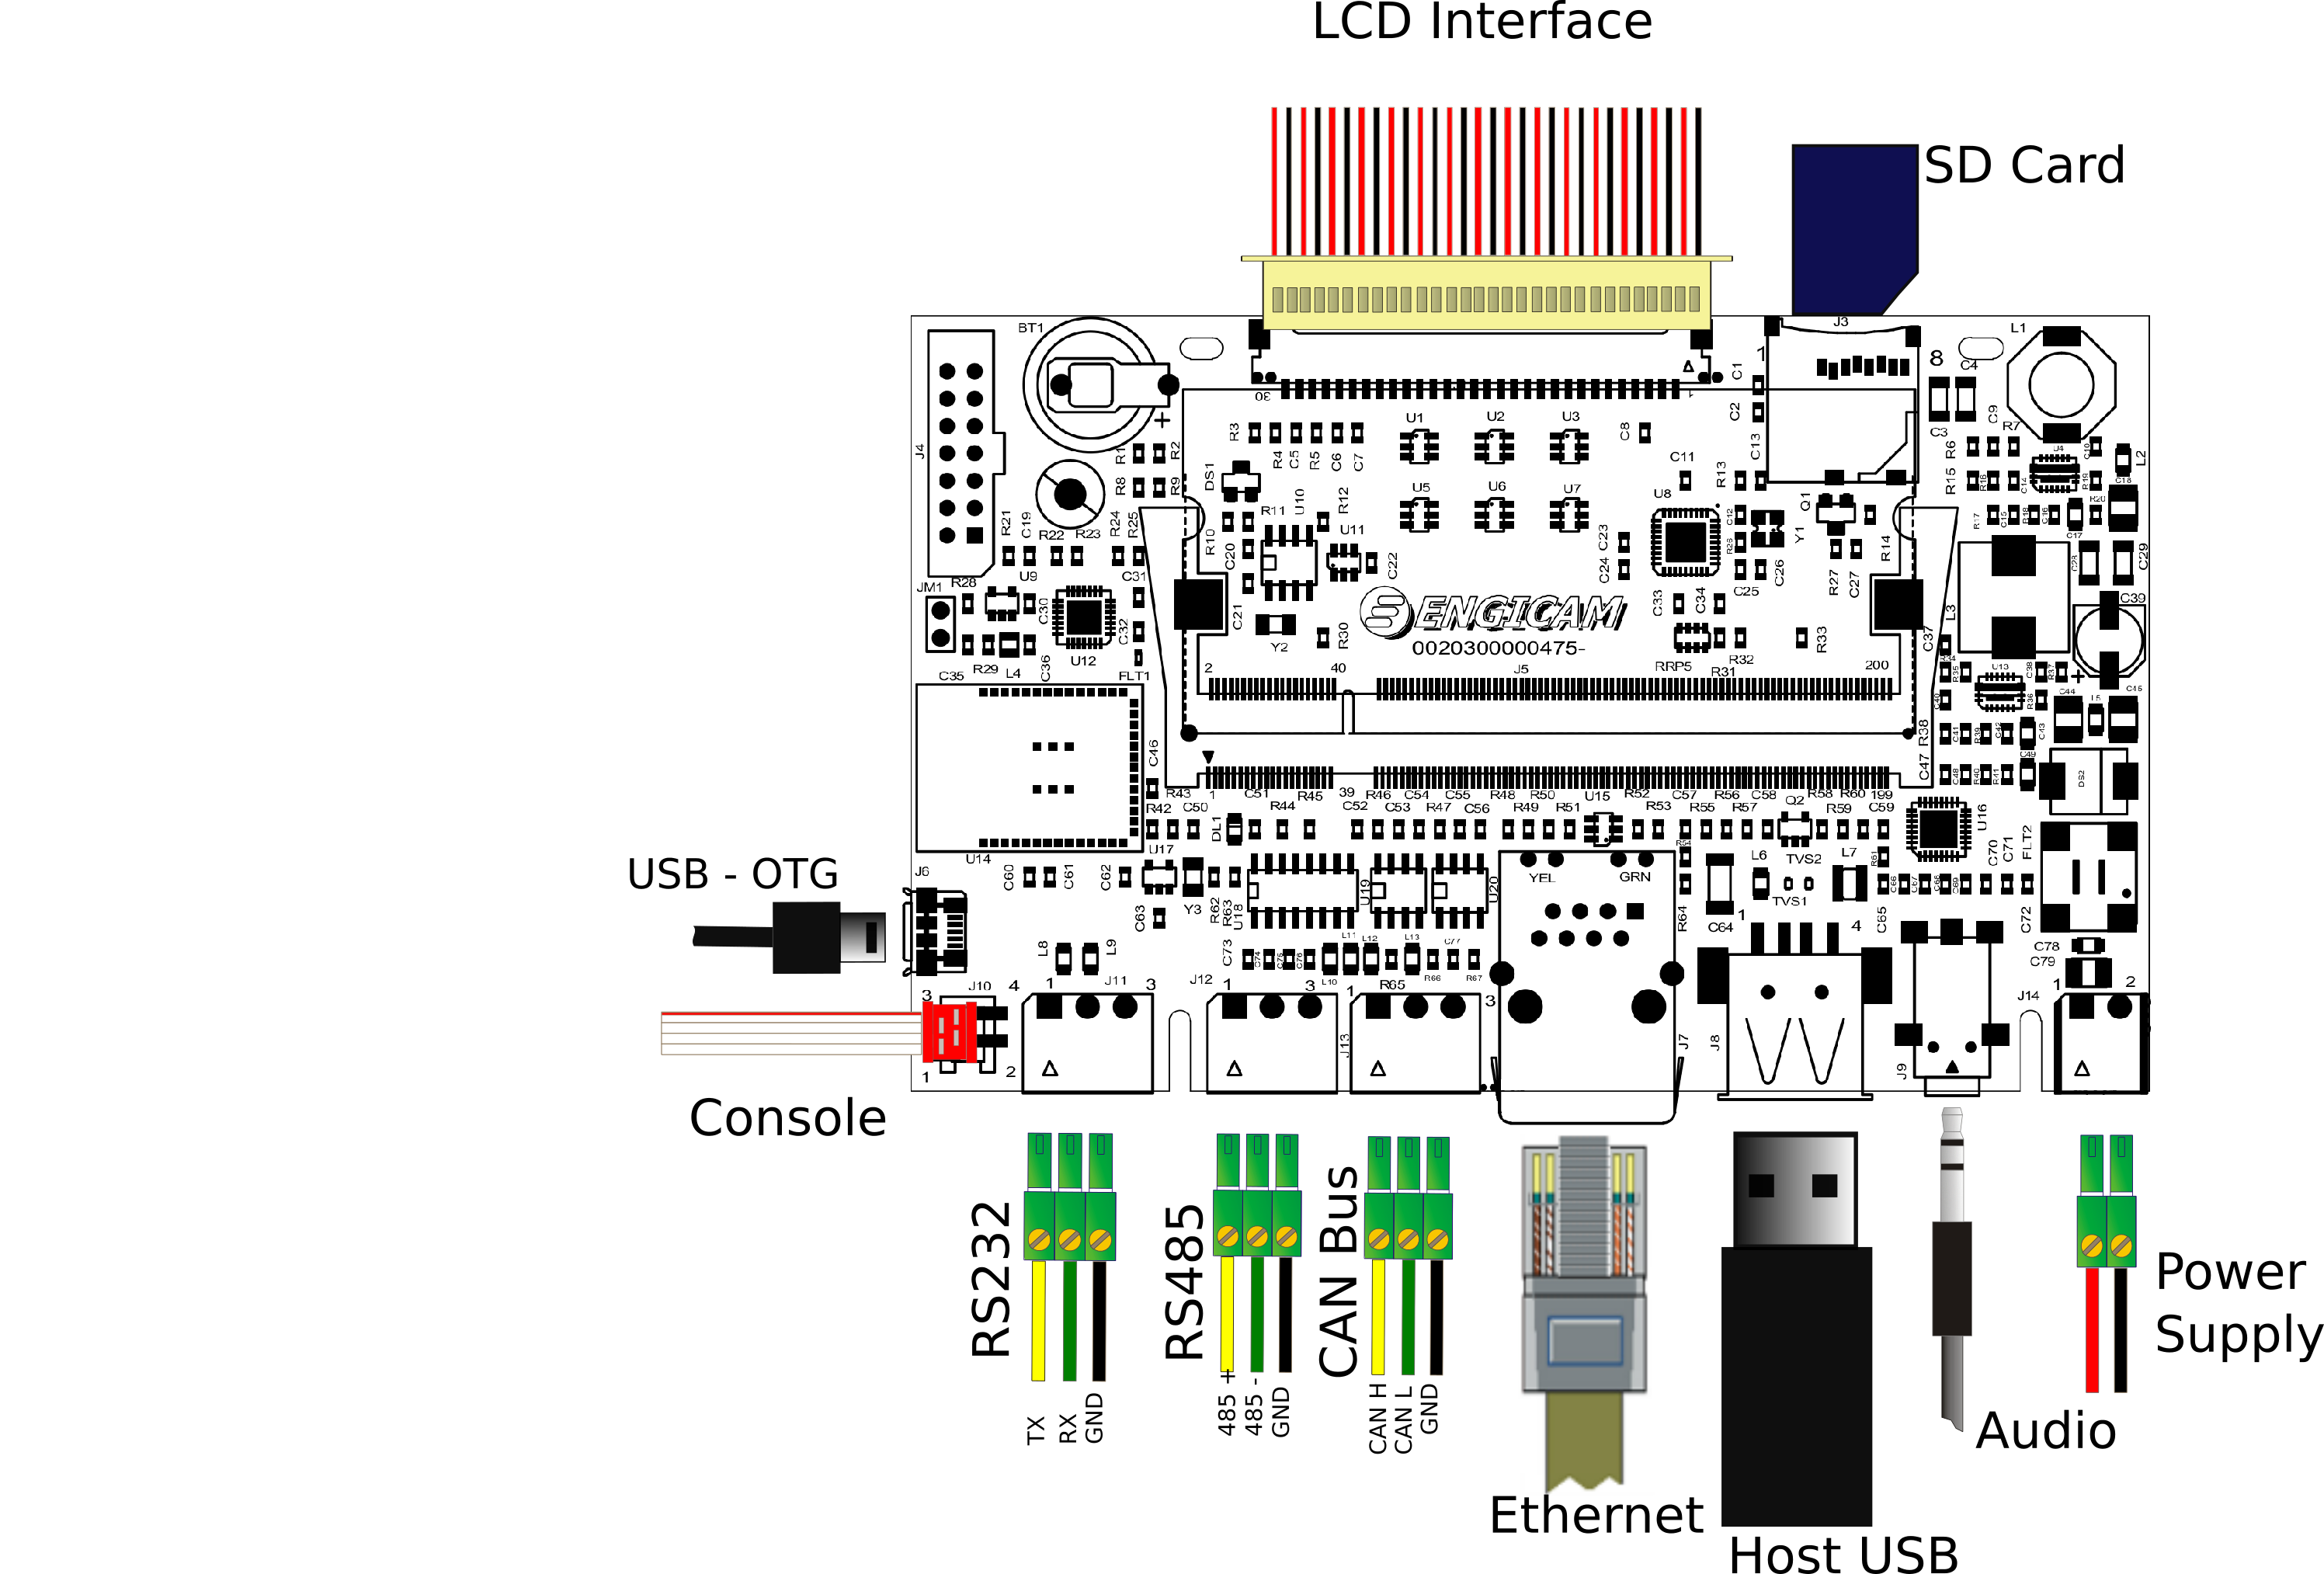
U-boot tests
| Test | Status |
|---|---|
| eMMC Enviroment saving | OK |
| Sdcard Enviroment saving | OK |
| Ethernet | OK |
| Boot from eMMC | OK |
| Boot from sdcard | OK |
| USB | OK |
Test Notes:
eMMC Environment saving
Sdcard environment saving
Close the connector JM1:
Ethernet
Once the serverip has been saved:
The output should be:
Boot from eMMC
Open the connector JM1:
The output should be:
Boot from sdcard
Close the connector JM1:
The output should be:
USB
Plug USB storage devices in J8:
The output should be:
starting USB...
Bus usb@38200000: Register 2000140 NbrPorts 2
Starting the controller
USB XHCI 1.10
scanning bus usb@38200000 for devices... 5 USB Device(s) found
       scanning usb for storage devices... 1 Storage Device(s) found
The output should be (for example):
USB device tree:
  1  Hub (5 Gb/s, 0mA)
  |  U-Boot XHCI Host Controller
  |
  +-2  Hub (480 Mb/s, 2mA)
    |
    +-3  Human Interface (12 Mb/s, 350mA)
    |    eGalax Inc. eGalaxTouch P80H32 2905 v00_T1
    |
    +-4  Vendor specific (12 Mb/s, 100mA)
    |    Silicon Labs CP2102N USB to UART Bridge Cont cc7cb4986ce9ee11b47763914c11a64
    |
    +-5  Mass Storage (480 Mb/s, 200mA)
         Verbatim STORE N GO 072125AD020B8F58
Once done do:
to safely remove storage devices.
Kernel Linux tests
| Status | Test | Note |
|---|---|---|
| OK | Ethernet 0 (J7) | see note1 |
| OK | USB 2.0 (J8) | tested with USB stick |
| OK | SD card (JM1 closed) | boot system from SD card |
| OK | eMMC card (JM1 open) | boot system from eMMC |
| OK | UART 232 ttymxc0 (J11) | see note2 |
| OK | UART 485 ttymxc2 (J12) | see note3 |
| OK | Linux Console (J10) | |
| OK | WIFI | see note4 |
| OK | BLUETOOTH | see note5 |
| OK | RTC | see note6 |
| OK | Reboot | |
| OK | Audio | see note7 |
| N/A | CAN 0 (J13) | see note8 |
with Ampire 10.1
| Status | Test | Note |
|---|---|---|
| OK | LVDS | see note9 |
| OK | Backlight | see note10 |
| OK | Touchscreen | see note11 |
| OK | GPU | see note12 |
| OK | VPU | see note13 |
Note
Note 1
Connect board's ethernet with your machine's one.
On your machine launch iperf3 server by typing:
On board launch iperf3 in client mode:
Using the IP address of your server machine.
Output:
Connecting to host 192.168.10.1, port 5201
[  5] local 192.168.10.85 port 47390 connected to 192.168.10.1 port 5201
[ ID] Interval           Transfer     Bitrate         Retr  Cwnd
[  5]   0.00-1.00   sec  12.2 MBytes   103 Mbits/sec    0    188 KBytes
[  5]   1.00-2.00   sec  11.1 MBytes  93.3 Mbits/sec    0    188 KBytes
[  5]   2.00-3.00   sec  11.0 MBytes  92.3 Mbits/sec    0    188 KBytes
[  5]   3.00-4.00   sec  11.5 MBytes  96.5 Mbits/sec    0    188 KBytes
[  5]   4.00-5.00   sec  10.9 MBytes  91.2 Mbits/sec    0    188 KBytes
[  5]   5.00-6.00   sec  11.2 MBytes  94.4 Mbits/sec    0    188 KBytes
[  5]   6.00-7.00   sec  11.4 MBytes  95.4 Mbits/sec    0    188 KBytes
[  5]   7.00-8.00   sec  10.9 MBytes  91.2 Mbits/sec    0    188 KBytes
[  5]   8.00-9.00   sec  11.2 MBytes  94.4 Mbits/sec    0    188 KBytes
[  5]   9.00-10.01  sec  11.2 MBytes  93.1 Mbits/sec    0    188 KBytes
- - - - - - - - - - - - - - - - - - - - - - - - -
[ ID] Interval           Transfer     Bitrate         Retr
[  5]   0.00-10.01  sec   113 MBytes  94.7 Mbits/sec    0            sender
[  5]   0.00-10.03  sec   112 MBytes  94.1 Mbits/sec                  receiver

iperf Done.
Note 2
Connect TX/RX PIN connector J11 to the UART 232 port From terminal launch command:
Verify that the characters written from keyboard are echoed in terminal.
Note 3
Tested with other RS485 device connected with command:
Be sure to launch the command test_serial2 on both devices to see the communication between devices on the terminal:
Device = /dev/ttymxc2, Baudrate = 115200
Open Port
sent: [Test PACKETs 0#]
received: [Test PACKETs 0#]
sent: [Test PACKETs 1#]
received: [Test PACKETs 1#]
sent: [Test PACKETs 2#]
received: [Test PACKETs 2#]
sent: [Test PACKETs 3#]
received: [Test PACKETs 3#]
sent: [Test PACKETs 4#]
received: [Test PACKETs 4#]
...
Note 4
Sample commands for wifi testing:
ifconfig eth0 down
echo "nameserver 8.8.8.8" > /etc/resolv.conf
ifconfig wlan0 up
iw dev wlan0 scan | grep SSID
wpa_passphrase SSID password > /etc/wpa_supplicant.conf
wpa_supplicant -iwlan0 -Dnl80211 -c/etc/wpa_supplicant.conf -B
udhcpc -i wlan0
On walnascar wpa_supplicant 2.11 doen't work properly with brcmfmac driver. If you want to use wpa_supplicant include the package:
in your image.
If you have rfkill enabled in kernel command ifconfig wlan0 up
may fail due to rfkill. Type:
Example output:
So type:
to unlock wlan.
Alternatively you can use iwd. Remember to uncomment the line
inside recipe /recipes-core/packagegroups/packagegroup.bbappend.
At first use type:
$ iwctl
[iwd]# device list
                           Devices
--------------------------------------------------------------------------------
  Name                  Address               Powered     Adapter     Mode
--------------------------------------------------------------------------------
  wlan0                 ff:ff:ff:ff:ff:ff     on          phy0        station

[iwd]# device wlan0 set-property Powered on
[iwd]# device phy0 set-property Powered on
[iwd]# station wlan0 scan
[iwd]# station wlan0 get-networks
                                 Available Networks
--------------------------------------------------------------------------------
    Network name                         Security                Signal
--------------------------------------------------------------------------------
>   <SSID>                               psk                     ****

[iwd]# station wlan0 connect SSID
...passphrase will be reqested...
[iwd]# quit
$ udhcpc -i wlan0
$ ping www.google.com
PING www.google.com (216.58.209.36) 56(84) bytes of data.
64 bytes from mil07s12-in-f4.1e100.net (216.58.209.36): icmp_seq=1 ttl=114 time=37.1 ms
64 bytes from mil07s12-in-f4.1e100.net (216.58.209.36): icmp_seq=2 ttl=114 time=44.4 ms
64 bytes from mil07s12-in-f4.1e100.net (216.58.209.36): icmp_seq=3 ttl=114 time=46.4 ms
64 bytes from mil07s12-in-f4.1e100.net (216.58.209.36): icmp_seq=4 ttl=114 time=44.6 ms
64 bytes from mil07s12-in-f4.1e100.net (216.58.209.36): icmp_seq=5 ttl=114 time=44.3 ms
...
iwd automatically stores network passphrases in the /var/lib/iwd directory and uses them to auto-connect in the future.
Note 5
Commands for bluetooth testing:
brcm_patchram_plus \
  --patchram /etc/firmware/BCM43430A1.1DX.hcd \
  --enable_hci --no2bytes --tosleep 1000 \
  /dev/ttyUSB0 &

hciconfig hci0 up
hcitool scan
If you have rfkill enabled in kernel after the brcm_patchram_plus command type:
Example output:
So type:
to unlock bluetooth.
Note 6
Set a time and date to the clock:
Turn off the system and power it back on. Once it booted check that the date is the same:
Note 7
Play back an audio file with command:
Note 8
Connect J13 header to another board CAN header and configure related can links on both ends of the connection:
End A:
End B (for example on other board, can1):
Enable interfaces on both ends:
End A:
End B (for example on other board, can1):
Make End A listen:
Send a frame from End B:
Check output on End A:
Do the same from B to A (make B listen and A send a frame).
Note 9
Tested with command:
gst-launch-1.0 -v videotestsrc ! capsfilter caps="video/x-raw, width=1280, height=800" ! autovideosink
Note 10
Tested with command:
where n is an integer from 0 to 100
Note 11
Tested with command:
Note 12
Use benchmark tool Glmark2:
Note 13
Commands for compressed file creation and playback.
Test vp8
gst-launch-1.0 videotestsrc ! video/x-raw, format=I420, width=640, height=480 ! vpuenc_vp8 ! matroskamux ! filesink location=file.mkv
gst-launch-1.0 filesrc location=file.mkv ! matroskademux ! queue ! vpudec ! queue ! waylandsink
Test h264
Test sheet i.Core MX8M Plus C.TOUCH 2.0
Test sheet
Version: 1.0
Preliminary
Creation of engicam-evaluation-image-mx8 image for sdcard booting and same image for eMMC programming.
Board Type: C.TOUCH 2.0
SOM Type: i.Core MX8M Plus, i.Core MX8M Plus 2GbE, i.Core MX8M Plus Fast Ethernet
U-boot tests
| Test | Status |
|---|---|
| eMMC Enviroment saving | OK |
| Sdcard Enviroment saving | OK |
| Ethernet | OK |
| Boot from nand | OK |
| Boot from sdcard | OK |
| USB | OK |
Test Notes:
eMMC Environment saving
Sdcard environment saving
Close the connector JM1:
Ethernet
Once the serverip has been saved:
The output should be:
Boot from eMMC
Open the connector JM1:
The output should be:
Boot from sdcard
Close the connector JM1:
The output should be:
USB
Plug USB storage devices in J8:
The output should be:
starting USB...
Bus usb@38200000: Register 2000140 NbrPorts 2
Starting the controller
USB XHCI 1.10
scanning bus usb@38200000 for devices... 5 USB Device(s) found
       scanning usb for storage devices... 1 Storage Device(s) found
The output should be (for example):
USB device tree:
  1  Hub (5 Gb/s, 0mA)
  |  U-Boot XHCI Host Controller
  |
  +-2  Hub (480 Mb/s, 2mA)
    |
    +-3  Human Interface (12 Mb/s, 350mA)
    |    eGalax Inc. eGalaxTouch P80H32 2905 v00_T1
    |
    +-4  Vendor specific (12 Mb/s, 100mA)
    |    Silicon Labs CP2102N USB to UART Bridge Cont cc7cb4986ce9ee11b47763914c11a64
    |
    +-5  Mass Storage (480 Mb/s, 200mA)
         Verbatim STORE N GO 072125AD020B8F58
Once done do:
to safely remove storage devices.
Kernel Linux tests
| Status | Test | Note |
|---|---|---|
| OK | Ethernet 0 (J7) | see note1 |
| OK | USB 2.0 (J8) | tested with USB stick |
| OK | SD card (JM1 closed) | boot system from SD card |
| OK | eMMC card (JM1 open) | boot system from eMMC |
| OK | UART 232 ttymxc0 (J11) | see note2 |
| OK | UART 485 ttymxc2 (J12) | see note3 |
| OK | Linux Console (J10) | |
| OK | WIFI | see note4 |
| OK | BLUETOOTH | see note5 |
| OK | RTC | see note6 |
| OK | Reboot | |
| OK | LVDS | see note7 |
| OK | Backlight | see note8 |
| OK | Touchscreen | see note9 |
| OK | Audio | see note10 |
| OK | CAN 0 (J13) | see note11 |
| OK | GPU | see note12 |
| OK | VPU | see note13 |
Note
Note 1
Connect board's ethernet with your machine's one.
On your machine launch iperf3 server by typing:
On board launch iperf3 in client mode:
Using the IP address of your server machine.
Output:
Connecting to host 192.168.10.1, port 5201
[  5] local 192.168.10.85 port 47390 connected to 192.168.10.1 port 5201
[ ID] Interval           Transfer     Bitrate         Retr  Cwnd
[  5]   0.00-1.00   sec  12.2 MBytes   103 Mbits/sec    0    188 KBytes
[  5]   1.00-2.00   sec  11.1 MBytes  93.3 Mbits/sec    0    188 KBytes
[  5]   2.00-3.00   sec  11.0 MBytes  92.3 Mbits/sec    0    188 KBytes
[  5]   3.00-4.00   sec  11.5 MBytes  96.5 Mbits/sec    0    188 KBytes
[  5]   4.00-5.00   sec  10.9 MBytes  91.2 Mbits/sec    0    188 KBytes
[  5]   5.00-6.00   sec  11.2 MBytes  94.4 Mbits/sec    0    188 KBytes
[  5]   6.00-7.00   sec  11.4 MBytes  95.4 Mbits/sec    0    188 KBytes
[  5]   7.00-8.00   sec  10.9 MBytes  91.2 Mbits/sec    0    188 KBytes
[  5]   8.00-9.00   sec  11.2 MBytes  94.4 Mbits/sec    0    188 KBytes
[  5]   9.00-10.01  sec  11.2 MBytes  93.1 Mbits/sec    0    188 KBytes
- - - - - - - - - - - - - - - - - - - - - - - - -
[ ID] Interval           Transfer     Bitrate         Retr
[  5]   0.00-10.01  sec   113 MBytes  94.7 Mbits/sec    0            sender
[  5]   0.00-10.03  sec   112 MBytes  94.1 Mbits/sec                  receiver

iperf Done.
Note 2
Connect TX/RX PIN connector J11 to the UART 232 port From terminal launch command:
Verify that the characters written from keyboard are echoed in terminal.
Note 3
Tested with other RS485 device connected with command:
Be sure to launch the command test_serial2 on both devices to see the communication between devices on the terminal:
Device = /dev/ttymxc2, Baudrate = 115200
Open Port
sent: [Test PACKETs 0#]
received: [Test PACKETs 0#]
sent: [Test PACKETs 1#]
received: [Test PACKETs 1#]
sent: [Test PACKETs 2#]
received: [Test PACKETs 2#]
sent: [Test PACKETs 3#]
received: [Test PACKETs 3#]
sent: [Test PACKETs 4#]
received: [Test PACKETs 4#]
...
Note 4
Sample commands for wifi testing:
ifconfig eth0 down
echo "nameserver 8.8.8.8" > /etc/resolv.conf
ifconfig wlan0 up
iw dev wlan0 scan | grep SSID
wpa_passphrase SSID password > /etc/wpa_supplicant.conf
wpa_supplicant -iwlan0 -Dnl80211 -c/etc/wpa_supplicant.conf -B
udhcpc -i wlan0
On walnascar wpa_supplicant 2.11 doen't work properly with brcmfmac driver. If you want to use wpa_supplicant include the package:
in your image.
If you have rfkill enabled in kernel command ifconfig wlan0 up
may fail due to rfkill. Type:
Example output:
So type:
to unlock wlan.
Alternatively you can use iwd. Remember to uncomment the line
inside recipe /recipes-core/packagegroups/packagegroup.bbappend.
At first use type:
$ iwctl
[iwd]# device list
                           Devices
--------------------------------------------------------------------------------
  Name                  Address               Powered     Adapter     Mode
--------------------------------------------------------------------------------
  wlan0                 ff:ff:ff:ff:ff:ff     on          phy0        station

[iwd]# device wlan0 set-property Powered on
[iwd]# device phy0 set-property Powered on
[iwd]# station wlan0 scan
[iwd]# station wlan0 get-networks
                                 Available Networks
--------------------------------------------------------------------------------
    Network name                         Security                Signal
--------------------------------------------------------------------------------
>   <SSID>                               psk                     ****

[iwd]# station wlan0 connect SSID
...passphrase will be reqested...
[iwd]# quit
$ udhcpc -i wlan0
$ ping www.google.com
PING www.google.com (216.58.209.36) 56(84) bytes of data.
64 bytes from mil07s12-in-f4.1e100.net (216.58.209.36): icmp_seq=1 ttl=114 time=37.1 ms
64 bytes from mil07s12-in-f4.1e100.net (216.58.209.36): icmp_seq=2 ttl=114 time=44.4 ms
64 bytes from mil07s12-in-f4.1e100.net (216.58.209.36): icmp_seq=3 ttl=114 time=46.4 ms
64 bytes from mil07s12-in-f4.1e100.net (216.58.209.36): icmp_seq=4 ttl=114 time=44.6 ms
64 bytes from mil07s12-in-f4.1e100.net (216.58.209.36): icmp_seq=5 ttl=114 time=44.3 ms
...
iwd automatically stores network passphrases in the /var/lib/iwd directory and uses them to auto-connect in the future.
Note 5
Commands for bluetooth testing:
brcm_patchram_plus \
  --patchram /etc/firmware/BCM43430A1.1DX.hcd \
  --enable_hci --no2bytes --tosleep 1000 \
  /dev/ttyUSB0 &

hciconfig hci0 up
hcitool scan
If you have rfkill enabled in kernel after the brcm_patchram_plus command type:
Example output:
So type:
to unlock bluetooth.
Note 6
Set a time and date to the clock:
Turn off the system and power it back on. Once it booted check that the date is the same:
Note 7
Tested with command:
gst-launch-1.0 -v videotestsrc ! capsfilter caps="video/x-raw, width=1280, height=800" ! autovideosink
Note 8
Tested with command:
where n is an integer from 0 to 100
Note 9
Tested with command:
Note 10
Play back an audio file with command:
Note 11
Connect J13 header to another board CAN header and configure related can links on both ends of the connection:
End A:
End B (for example on other board, can1):
Enable interfaces on both ends:
End A:
End B (for example on other board, can1):
Make End A listen:
Send a frame from End B:
Check output on End A:
Do the same from B to A (make B listen and A send a frame).
Note 12
Use benchmark tool Glmark2:
Note 13
Commands for compressed file creation and playback.
Test h265
GST_DEBUG=3 gst-launch-1.0 videotestsrc ! videoconvert ! queue ! vpuenc_hevc ! h265parse ! filesink location=file.mkv
gst-launch-1.0 filesrc location=./file.mkv !  queue ! h265parse ! vpudec !  queue ! waylandsink
Test h264
Test sheet i.Core MX93 Plus C.TOUCH 2.0
Test sheet
Version: 1.0
Preliminary
Creation of engicam-evaluation-image-mx93 image for sdcard booting and same image for eMMC programming.
Board Type: C.TOUCH 2.0
SOM Type: i.Core MX93
U-boot tests
| Test | Status |
|---|---|
| eMMC Enviroment saving | OK |
| Sdcard Enviroment saving | OK |
| Ethernet | OK |
| Boot from eMMC | OK |
| Boot from sdcard | OK |
| USB | OK |
Test Notes:
eMMC Environment saving
Sdcard environment saving
Close the connector JM1:
Ethernet
Once the serverip has been saved:
The output should be:
Boot from eMMC
Open the connector JM1:
The output should be:
Boot from sdcard
Close the connector JM1:
The output should be:
USB
Plug USB storage devices in J8:
The output should be:
starting USB...
Bus usb@4c100000: Port not available.
Bus usb@4c200000: USB EHCI 1.00
scanning bus usb@4c200000 for devices... 5 USB Device(s) found
       scanning usb for storage devices... 1 Storage Device(s) found
The output should be (for example):
USB device tree:
  1  Hub (480 Mb/s, 0mA)
  |  u-boot EHCI Host Controller
  |
  +-2  Hub (480 Mb/s, 2mA)
    |
    +-3  Mass Storage (480 Mb/s, 100mA)
    |    Lexar USB Flash Drive AAGQFTGHNCK9GDXE
    |
    +-4  Human Interface (12 Mb/s, 350mA)
    |    eGalax Inc. eGalaxTouch P80H32 2905 v00_T1
    |
    +-5  Vendor specific (12 Mb/s, 100mA)
         Silicon Labs CP2102N USB to UART Bridge Cont cc7cb4986ce9ee11b47763914c11a64
Once done do:
to safely remove storage devices.
Kernel Linux tests
| Status | Test | Note |
|---|---|---|
| OK | Ethernet 0 (J7) | see note1 |
| OK | USB 2.0 (J8) | tested with USB stick |
| OK | SD card (JM1 closed) | boot system from SD card |
| OK | eMMC card (JM1 open) | boot system from eMMC |
| OK | UART 232 ttyLP7 (J11) | see note2 |
| OK | UART 485 ttyLP4 (J12) | see note3 |
| OK | Linux Console (J10) | |
| OK | WIFI | see note4 |
| OK | BLUETOOTH | see note5 |
| OK | RTC | see note6 |
| OK | Reboot | |
| OK | LVDS | see note7 |
| OK | Backlight | see note8 |
| OK | Touchscreen | see note9 |
| OK | Audio | see note10 |
| OK | CAN 0 (J13) | see note11 |
| N/A | GPU | see note12 |
| N/A | VPU | see note13 |
Note
Note 1
Connect board's ethernet with your machine's one.
On your machine launch iperf3 server by typing:
On board launch iperf3 in client mode:
Using the IP address of your server machine.
Output:
Connecting to host 192.168.10.1, port 5201
[  5] local 192.168.10.85 port 47390 connected to 192.168.10.1 port 5201
[ ID] Interval           Transfer     Bitrate         Retr  Cwnd
[  5]   0.00-1.00   sec  12.2 MBytes   103 Mbits/sec    0    188 KBytes
[  5]   1.00-2.00   sec  11.1 MBytes  93.3 Mbits/sec    0    188 KBytes
[  5]   2.00-3.00   sec  11.0 MBytes  92.3 Mbits/sec    0    188 KBytes
[  5]   3.00-4.00   sec  11.5 MBytes  96.5 Mbits/sec    0    188 KBytes
[  5]   4.00-5.00   sec  10.9 MBytes  91.2 Mbits/sec    0    188 KBytes
[  5]   5.00-6.00   sec  11.2 MBytes  94.4 Mbits/sec    0    188 KBytes
[  5]   6.00-7.00   sec  11.4 MBytes  95.4 Mbits/sec    0    188 KBytes
[  5]   7.00-8.00   sec  10.9 MBytes  91.2 Mbits/sec    0    188 KBytes
[  5]   8.00-9.00   sec  11.2 MBytes  94.4 Mbits/sec    0    188 KBytes
[  5]   9.00-10.01  sec  11.2 MBytes  93.1 Mbits/sec    0    188 KBytes
- - - - - - - - - - - - - - - - - - - - - - - - -
[ ID] Interval           Transfer     Bitrate         Retr
[  5]   0.00-10.01  sec   113 MBytes  94.7 Mbits/sec    0            sender
[  5]   0.00-10.03  sec   112 MBytes  94.1 Mbits/sec                  receiver

iperf Done.
Note 2
Connect TX/RX PIN connector J11 to the UART 232 port From terminal launch command:
Verify that the characters written from keyboard are echoed in terminal.
Note 3
Tested with other RS485 device connected with command:
Be sure to launch the command test_serial2 on both devices to see the communication between devices on the terminal:
Device = /dev/ttyLP4, Baudrate = 115200
Open Port
sent: [Test PACKETs 0#]
received: [Test PACKETs 0#]
sent: [Test PACKETs 1#]
received: [Test PACKETs 1#]
sent: [Test PACKETs 2#]
received: [Test PACKETs 2#]
sent: [Test PACKETs 3#]
received: [Test PACKETs 3#]
sent: [Test PACKETs 4#]
received: [Test PACKETs 4#]
...
Note 4
Sample commands for wifi testing:
ifconfig eth0 down
echo "nameserver 8.8.8.8" > /etc/resolv.conf
ifconfig wlan0 up
iw dev wlan0 scan | grep SSID
wpa_passphrase SSID password > /etc/wpa_supplicant.conf
wpa_supplicant -iwlan0 -Dnl80211 -c/etc/wpa_supplicant.conf -B
udhcpc -i wlan0
On walnascar wpa_supplicant 2.11 doen't work properly with brcmfmac driver. If you want to use wpa_supplicant include the package:
in your image.
If you have rfkill enabled in kernel command ifconfig wlan0 up
may fail due to rfkill. Type:
Example output:
So type:
to unlock wlan.
Alternatively you can use iwd. Remember to uncomment the line
inside recipe /recipes-core/packagegroups/packagegroup.bbappend.
At first use type:
$ iwctl
[iwd]# device list
                           Devices
--------------------------------------------------------------------------------
  Name                  Address               Powered     Adapter     Mode
--------------------------------------------------------------------------------
  wlan0                 ff:ff:ff:ff:ff:ff     on          phy0        station

[iwd]# device wlan0 set-property Powered on
[iwd]# device phy0 set-property Powered on
[iwd]# station wlan0 scan
[iwd]# station wlan0 get-networks
                                 Available Networks
--------------------------------------------------------------------------------
    Network name                         Security                Signal
--------------------------------------------------------------------------------
>   <SSID>                               psk                     ****

[iwd]# station wlan0 connect SSID
...passphrase will be reqested...
[iwd]# quit
$ udhcpc -i wlan0
$ ping www.google.com
PING www.google.com (216.58.209.36) 56(84) bytes of data.
64 bytes from mil07s12-in-f4.1e100.net (216.58.209.36): icmp_seq=1 ttl=114 time=37.1 ms
64 bytes from mil07s12-in-f4.1e100.net (216.58.209.36): icmp_seq=2 ttl=114 time=44.4 ms
64 bytes from mil07s12-in-f4.1e100.net (216.58.209.36): icmp_seq=3 ttl=114 time=46.4 ms
64 bytes from mil07s12-in-f4.1e100.net (216.58.209.36): icmp_seq=4 ttl=114 time=44.6 ms
64 bytes from mil07s12-in-f4.1e100.net (216.58.209.36): icmp_seq=5 ttl=114 time=44.3 ms
...
iwd automatically stores network passphrases in the /var/lib/iwd directory and uses them to auto-connect in the future.
Note 5
Commands for bluetooth testing:
brcm_patchram_plus \
  --patchram /etc/firmware/BCM43430A1.1DX.hcd \
  --enable_hci --no2bytes --tosleep 1000 \
  /dev/ttyUSB0 &

hciconfig hci0 up
hcitool scan
If you have rfkill enabled in kernel after the brcm_patchram_plus command type:
Example output:
So type:
to unlock bluetooth.
Note 6
Set a time and date to the clock:
Turn off the system and power it back on. Once it booted check that the date is the same:
Note 7
Tested with command:
gst-launch-1.0 -v videotestsrc ! capsfilter caps="video/x-raw, width=1280, height=800" ! autovideosink
Note 8
Tested with command:
where n is an integer from 0 to 100
Note 9
Tested with command:
Note 10
Play back an audio file with command:
Note 11
Connect J13 header to another board CAN header and configure related can links on both ends of the connection:
End A:
End B (for example on other board, can1):
Enable interfaces on both ends:
End A:
End B (for example on other board, can1):
Make End A listen:
Send a frame from End B:
Check output on End A:
Do the same from B to A (make B listen and A send a frame).
Note 12
Use benchmark tool Glmark2:
Note 13
Commands for compressed file creation and playback.
Test h265
GST_DEBUG=3 gst-launch-1.0 videotestsrc ! videoconvert ! queue ! vpuenc_hevc ! h265parse ! filesink location=file.mkv
gst-launch-1.0 filesrc location=./file.mkv !  queue ! h265parse ! vpudec !  queue ! waylandsink