MEDIATEK Quick Start
Using Windows?
The Yocto build system requires a Linux environment. If you are on Windows, you can download the Engicam pre-configured Ubuntu virtual machine instead of setting up the toolchain manually. Download the Virtual Machine
There are two ways to set up the build environment:
- Engicam BSP Scripts (recommended) — a Docker-based helper that runs the build in an isolated container. No dependency on your host Linux distribution; works on any system with Docker installed.
- Native build — build directly on your Linux machine without Docker. You must ensure your distribution is compatible with the target Yocto release.
Regardless of the method chosen, the procedure is the same: download the BSP sources and build the image.
Build Environment Setup
Source: engicam-bsp-scripts
Engicam BSP Script
Install repo on Ubuntu
This script utilizes repo to download the correct source files.
To install the repo utility:
mkdir -p ~/.bin
PATH="${HOME}/.bin:${PATH}"
curl https://storage.googleapis.com/git-repo-downloads/repo > ~/.bin/repo
chmod a+rx ~/.bin/repo
Install Docker Engine on Ubuntu
This script utilizes Docker in order to assure the compatibility between Yocto and Ubuntu versions.
To install Docker correctly you need to:
Setup the repository
Update the apt package index and install the following packages to allow apt to use a repository over HTTPS:
sudo apt-get update
sudo apt-get install apt-transport-https ca-certificates \
curl gnupg-agent software-properties-common linux-generic
Add Docker's official GPG key:
curl -fsSL https://download.docker.com/linux/ubuntu/gpg | sudo apt-key add -
Verify that you now have the key with the fingerprint 9DC8 5822 9FC7 DD38 854A E2D8 8D81 803C 0EBF CD88, by searching for the last 8 characters of the fingerprint:
sudo apt-key fingerprint 0EBFCD88
You should get this same output:
pub rsa4096 2017-02-22 [SCEA]
    9DC8 5822 9FC7 DD38 854A E2D8 8D81 803C 0EBF CD88
uid [ unknown] Docker Release (CE deb) <docker@docker.com>
sub rsa4096 2017-02-22 [S]
Use the following command to set up the stable repository:
sudo add-apt-repository "deb [arch=amd64] https://download.docker.com/linux/ubuntu \
$(lsb_release -cs) stable"
Install Docker Engine:
sudo apt-get update
sudo apt-get install docker-ce docker-ce-cli containerd.io
Download and use setup script
First you need to clone the git repository:
git clone https://github.com/engicam-stable/engicam-bsp-scripts.git
Go into the directory just created and launch the script to prepare the environment:
cd ~/engicam-bsp-scripts
./prepare_engicam_bsp --help
./prepare_engicam_bsp <branch> <version>
The next table will list all the available environments.
| branch | version |
|---|---|
| nxp | zeus |
| nxp | zeus-2.3 |
| nxp | gatesgarth |
| nxp | hardknott |
| nxp | honister |
| nxp | kirkstone |
| nxp | langdale |
| nxp | mickledore |
| nxp | scarthgap |
| nxp | walnascar |
| st | dunfell |
| st | dunfell-5.10_icore |
| st | dunfell-5.10_ugea |
| st | kirkstone |
| st | mickledore |
| rockchip | kirkstone |
| mediatek | scarthgap |
For example:
./prepare_engicam_bsp nxp zeus-2.3
or:
./prepare_engicam_bsp st dunfell
This procedure may take some time to complete. Once it\'s finished you can find all source code in the /yocto folder.
Note: to return to the same Docker environment you just need to relaunch the same command used to set it up the first time.
BSP Sources and First Build
Sources already downloaded?
If you completed the build environment setup above using the Engicam BSP Scripts, the sources have already been downloaded — skip directly to the build command in the relevant tab.
meta-engicam-mediatek
Setup Build Environment (Linux)
To build images of |IOT-YOCTO| you need:
- Ubuntu 22.04 (LTS)
- At least 400 GiB of free disk space
- At least 64 GiB of system memory for a 16-core system
- Internet connection
On Ubuntu, use the following command to install the required packages:
sudo apt-get install gawk wget git diffstat unzip texinfo gcc build-essential chrpath socat cpio python3 python3-pip python3-pexpect xz-utils debianutils iputils-ping python3-git python3-jinja2 libegl1-mesa libelf-dev libsdl1.2-dev lz4 pylint xterm python3-subunit mesa-common-dev libstdc++-12-dev libssl-dev
And install the latest repo tool:
mkdir -p ~/bin
PATH="${HOME}/bin:${PATH}"
curl https://storage.googleapis.com/git-repo-downloads/repo > ~/bin/repo
chmod a+rx ~/bin/repo
Project Root
Choose a directory as the root of your IoT Yocto project:
In the following sections, we use $PROJ_ROOT as the root directory of your Yocto project.
Download the Recipes
repo init -u https://gitlab.com/mediatek/aiot/bsp/manifest.git -b refs/tags/rity-scarthgap-v26.0
repo sync
cd src/
git clone https://github.com/engicam-stable/meta-engicam-mediatek.git -b rity-scarthgap-v26.0
Configure Build Environment
After the recipes are downloaded, use the following commands to initialize a Yocto project build environment:
export TEMPLATECONF=$PROJ_ROOT/src/meta-engicam-mediatek/conf/templates/default
source src/poky/oe-init-build-env build
export BUILD_DIR=`pwd`
Build the Packages
Flash Image to Board
This guide shows how to “flash”(write) the system image into the non-volatile flash memory of Genio 720. The flashing process is performed over a USB connection between the target board and the host computer containing the image.
In order to write the on-board storage with Genio Tools, you need to set the SoC in download mode, which allows AIoT Tools to transfer a download agent binary to the SRAM of SoC. The download agent then provides a fastboot interface for subsequent image transfer and storage write operations.
Genio Tools
Genio tools are a set of tools to configure or interact with MediaTek Genio boards. MediaTek and community developers write the Genio tools in Python. Ensure you have Python 3.9 or later installed on your system. We recommend installing Python 3.12 since Python 3.9 have reached end-of-life. Genio Tools v1.7 is tested with Python 3.12.
If you don’t have Python 3 and pip installed, run following commands to install them.
Genio tools use Fastboot to flash images onto the device. After flashing the board with rity-demo-image, you can use the ADB tool to interact with the device, such as running commands and transferring files.
Both Fastboot and ADB tools are available as packages for Ubuntu. Please run following commands to install the tools:
Install Genio Tools:
Flash Image to Board
Genio 720 Smarcore
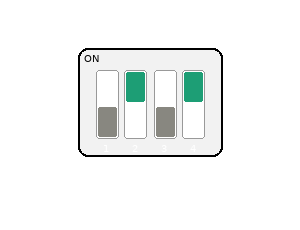
UFS Boot
Boot from UFS storage.
The image should be built using genio-720-smarcore-evb-ufs config.
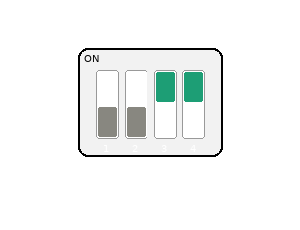
eMMC Boot
Boot from eMMC storage.
The image should be built using genio-720-smarcore-evb config.
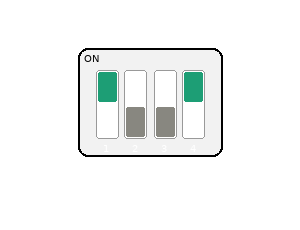
NOR Boot
Boot from SPI NOR flash storage, and then boot to system on UFS storage. The image should be built using genio-720-smarcore-evb-norboot-ufs config.
Genio 720 TIA
UFS or eMMC Boot
Boot from UFS or eMMC storage.
The image should be built using genio-720-tia-ufs or genio-720-tia config.
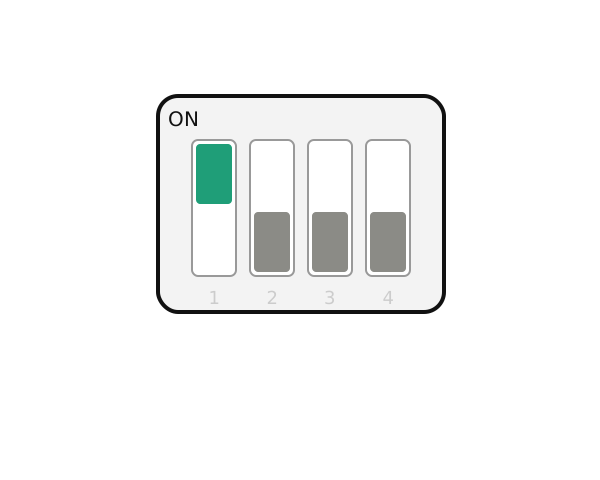
Set the DIP switches to USB Serial Download Mode, as shown in the image below.
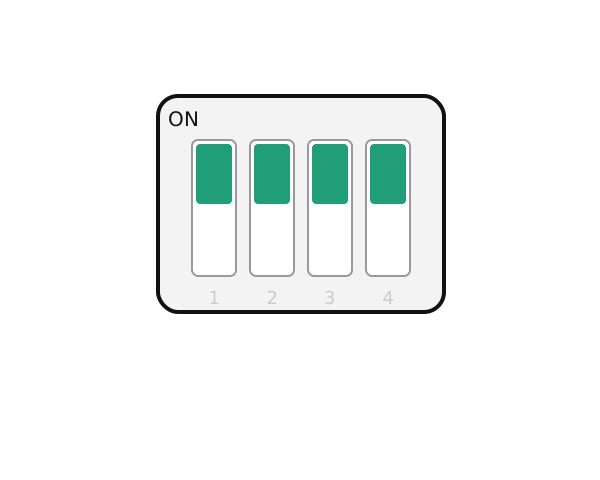
Connect the board to the host PC via the USB-C (J18) port, then power on the board.
Run the following commands to flash the image:
OR Then run:Once the flashing process is complete, set the DIP switches as shown in the image below.
NOR Boot
Boot from SPI NOR flash storage, and then boot to system on UFS or eMMC storage. The image should be built using genio-720-tia-norboot-ufs config.
Set the DIP switches to USB Serial Download Mode, as shown in the image below.
Connect the board to the host PC via the USB-C (J18) port, then power on the board.
Run the following commands to flash the image:
Once the flashing process is complete, set the DIP switches as shown in the image below.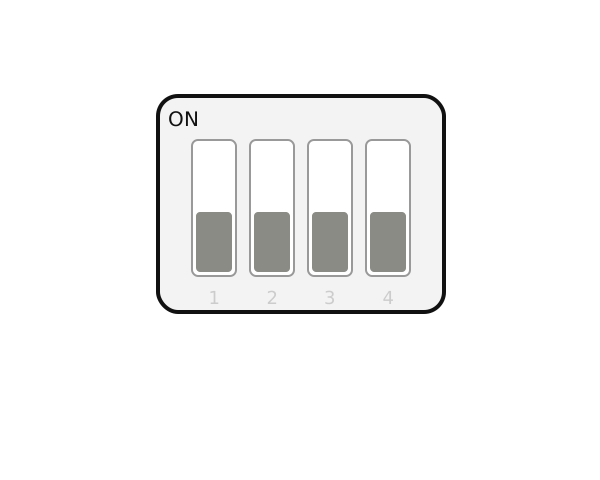
Test Sheet
For the test sheet related to the Genio 720, see the following document: